Boat and yacht detailing encompasses a suite of comprehensive cleaning, restoration, and protection services tailored for marine vessels of all sizes. Far more than a simple wash, meticulous detailing is a critical aspect of vessel maintenance, aimed at preserving the craft’s aesthetic appeal, structural integrity, and financial value, while also ensuring optimal performance and a pleasant onboard environment.
The overarching principle is that detailing is not merely cosmetic; it is a proactive preservation strategy crucial for combating the harsh marine environment.
1. Introduction to Boat & Yacht Detailing: Beyond the Surface
Boat and yacht detailing involves a systematic and thorough approach to cleaning, restoring, and protecting all surfaces of a marine vessel. This includes the hull, deck, superstructure, cabin interiors, technical spaces like engine rooms and bilges, and even specialized components such as canvas, clear vinyl, and metalwork. The primary objectives extend beyond mere cleanliness. Effective detailing aims to:
- Enhance Aesthetic Appeal: Restore and maintain the vessel’s original shine and visual splendor.
- Preserve and Increase Value: A well-maintained vessel commands a higher resale price and suffers less depreciation.
- Extend Longevity: Protect surfaces from environmental degradation (UV rays, saltwater, pollutants), thereby extending the life of materials and components.
- Improve Performance: A clean hull, free of marine growth, reduces drag and can improve fuel efficiency.
- Ensure Safety and Comfort: Clean, well-maintained non-skid surfaces, clear windows, and hygienic interiors contribute to a safer and more enjoyable boating experience.
The scope of detailing is comprehensive, addressing every facet of the vessel. This guide will explore the intricacies of exterior care, from basic washing to complex gelcoat restoration; interior rejuvenation, encompassing everything from carpets to headliners; the often-overlooked but critical maintenance of technical areas; and specialized services such as decal management and shrink wrap removal. Understanding these processes highlights that detailing is an essential investment in the vessel’s lifecycle management.
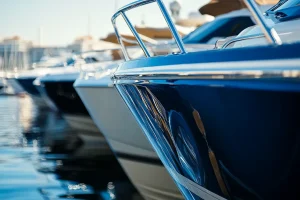
2. Mastering Exterior Detailing: From Hull to Canvas
The exterior of a boat or yacht is constantly exposed to harsh marine elements. A systematic approach to its detailing is crucial for protection and appearance.
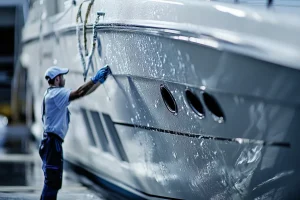
A. The Foundation: Washing Hull, Deck, and Superstructure
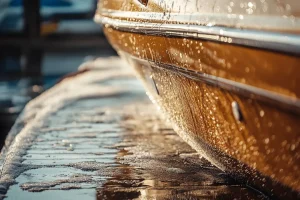
The initial wash is more than a superficial cleanse; it is the critical preparatory step for all subsequent detailing procedures, removing abrasive contaminants that could mar surfaces during polishing or waxing. The fundamental technique involves a thorough rinse with fresh water to dislodge loose dirt and salt. This is followed by washing the hull, deck, and superstructure with a suitable, preferably biodegradable, boat soap, often with a neutral pH, applied with soft brushes or wash mitts. Particular attention must be paid to removing all salt deposits, as salt is highly corrosive and accelerates the degradation of marine materials. After soaping and gentle agitation, a complete and copious fresh water rinse is necessary to remove all soap residues. Finally, drying with a chamois or microfiber towels helps prevent water spots, especially on glass and metal parts. This foundational cleaning ensures that waxes and polishes can bond effectively to a truly clean surface, enhancing their performance and longevity.
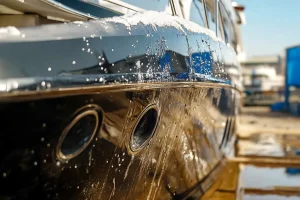
B. Below the Belt: Hull Cleaning for Marine Growth and Waterline Stains
Waterline stains and marine growth are common afflictions that detract significantly from a vessel’s appearance and can indicate underlying issues. These stains are typically caused by algae, barnacles, mineral deposits (like calcium and magnesium from the water), and pollutants such as oil and fuel residue that adhere to and penetrate the gelcoat. Simple surface cleaning is often insufficient for these tenacious marks.
The removal process generally involves:
- Pre-cleaning: Removing loose algae or growth with a scrub brush or high-pressure water.
- Application of Specialized Cleaners: Products specifically formulated for waterline stain removal, often containing acids like hydrochloric acid (e.g., Aurora Waterline Stain Remover), are applied to the stained area, typically with a chemically resistant roller. These cleaners work by chemically penetrating the pores of the gelcoat to lift the stain.
- Dwell Time: The product is allowed to sit for a specified period (e.g., 20-30 minutes) to act on the stain.
- Rinsing: Thorough rinsing with fresh water removes the cleaner and the dislodged stain. Stubborn stains may require a second application.
- Further Treatment: Remaining scuff marks might be addressed with a rubbing compound like Boat Scrub.
Given the acidic nature of many effective waterline stain removers, strict adherence to safety precautions is paramount. This includes wearing protective gear (gloves, eye protection), ensuring adequate ventilation, protecting adjacent painted surfaces or galvanized trailers with plastic sheeting, and testing on an inconspicuous area of colored gelcoat first for colorfastness.
The nature of these stains, often embedded within the gelcoat’s pores, means that their removal is a restorative chemical process rather than just surface cleaning. Preventative measures, such as the application of quality antifouling paints, can significantly reduce the adherence of marine growth and the severity of waterline staining.
C. Restoring Brilliance: Compounding and Polishing for Oxidation Removal and Gelcoat Restoration
 Gelcoat, the protective outer layer of most fiberglass boats, is susceptible to oxidation from UV radiation, saltwater, and environmental pollutants. This degradation manifests as a chalky, dull, or faded appearance. Restoring oxidized gelcoat is a multi-step process that goes beyond simple cleaning; it is a corrective procedure aimed at removing the damaged outer layer and revealing the vibrant, glossy finish beneath.
The typical restoration sequence includes:
- Thorough Washing: The surface must be meticulously cleaned to remove all dirt, grime, and old wax residues that could interfere with the compounding process. Marine-specific soaps and de-waxing solutions are often employed.
- Stain Removal: Any persistent stains, especially rust or waterline marks, should be addressed (as detailed previously) before compounding.
- Wet/Dry Sanding (for severe oxidation): In cases of extreme oxidation where compounding alone is insufficient, wet sanding with progressively finer grits of sandpaper (e.g., starting with 1000 grit and moving to 1500 or 2000 grit) may be necessary. This is an aggressive step that removes a significant amount of oxidized gelcoat and should be undertaken with extreme caution, as gelcoat has a finite thickness. It is often best left to professionals unless one has considerable experience.
- Compounding: A high-quality rubbing compound, formulated for marine gelcoat, is applied to the surface. Compounds contain abrasives that physically remove the oxidized layer and smooth out minor scratches and imperfections. Application can be done by hand, but for larger areas and more consistent results, a rotary or orbital polisher with appropriate cutting pads (e.g., wool for heavy cutting, foam for finishing) is recommended. The compound should be worked in sections, applying even pressure and keeping the polisher moving to avoid heat buildup and burning through the gelcoat.
- Polishing: After compounding, a finer polish is used to remove any swirl marks left by the compound and to further refine the surface, bringing out a high gloss. This step uses less aggressive abrasives and often employs softer foam polishing pads.
- Final Protection: Once the desired gloss is achieved, the restored gelcoat must be protected with a quality marine wax or sealant to prevent rapid re-oxidation.
The choice of products (compounds, polishes, pads) and machinery (rotary vs. orbital polishers) depends on the severity of oxidation and the detailer’s skill level. It’s a delicate balance: aggressive enough to remove the damage, yet gentle enough to preserve the gelcoat. This restorative process is fundamental to maintaining the boat’s appearance and protecting the underlying fiberglass structure.
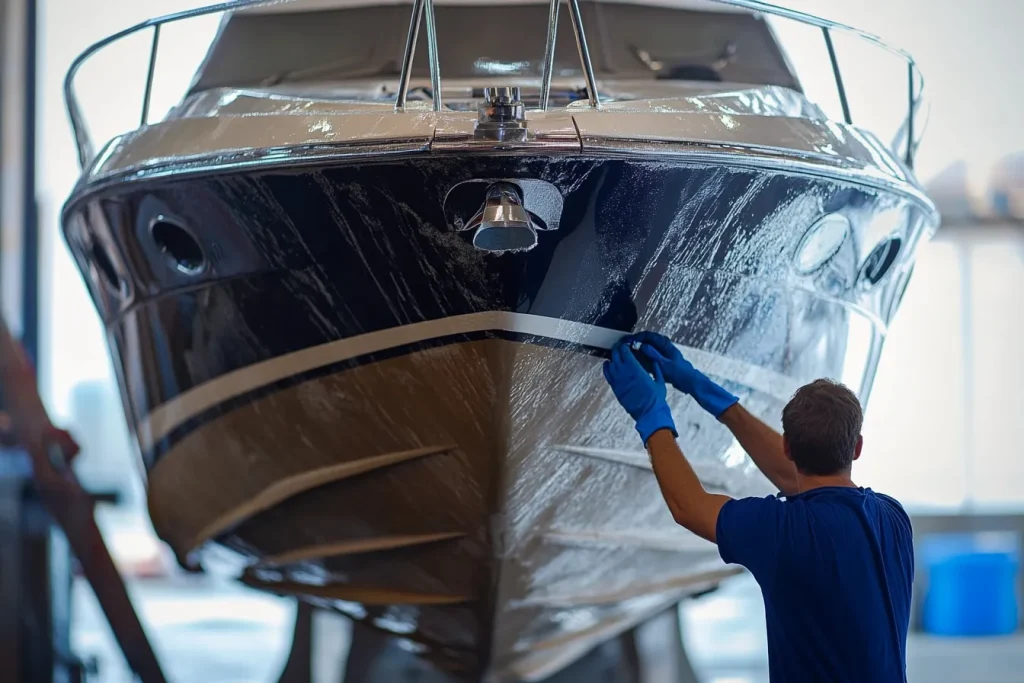
D. The Protective Shield: Waxing and Sealing for Lasting Shine and Defense
After the laborious processes of cleaning, and potentially compounding and polishing, applying a protective wax or sealant is the crucial final step in exterior gelcoat care. This isn’t merely for aesthetic shine; it creates a durable barrier against the elements, primarily UV radiation and saltwater, which are the main culprits in gelcoat oxidation and degradation. A properly waxed surface also repels dirt and grime, making future cleaning easier and helping to prevent stains from setting in.
The application process for waxes and sealants generally follows these steps:
- Surface Preparation: The surface must be impeccably clean, dry, and cool. If oxidation was present, it should have been removed through compounding and polishing.
- Gather Materials: This includes the chosen wax or sealant, clean applicator pads (microfiber or foam), and clean, dry microfiber towels for buffing.
- Optimal Conditions: Work on a mild, dry day, preferably in a shaded area or out of direct sunlight, to prevent the product from drying too quickly and unevenly.
- Application in Sections: Divide the boat’s surface into manageable sections (e.g., 2×2 feet or 3×3 feet). Apply a small amount of product to an applicator pad.
- Even Spreading: Apply the wax or sealant to one section at a time using gentle, overlapping circular or back-and-forth motions to ensure even coverage. Apply light pressure; excessive force is unnecessary.
- Drying to a Haze: Allow the product to dry to a haze according to the manufacturer’s instructions. Drying time varies based on the product and ambient conditions.
- Buffing: Once hazed, use a clean, dry microfiber towel to buff the residue off, revealing a glossy, slick surface. Buff with light to moderate pressure, turning the towel frequently. Some professionals may use an orbital buffer with a soft finishing pad for this stage.
- Second Coat (Optional but Recommended): Many experts recommend a second coat, applied 24 hours to 7 days after the first, for enhanced durability and protection.
Various types of protectants are available, including natural carnauba waxes (known for deep gloss but shorter lifespan), synthetic polymer sealants (often longer-lasting and more resistant to detergents), and hybrid ceramic coatings (offering superior durability and hydrophobic properties). Paste waxes are generally considered more durable than liquid waxes, though liquids can be easier to apply.
The choice depends on the desired balance of shine, durability, and ease of application. This protective layer is not a permanent solution and needs to be reapplied periodically (typically every 3-6 months, depending on exposure and product) to maintain its efficacy.
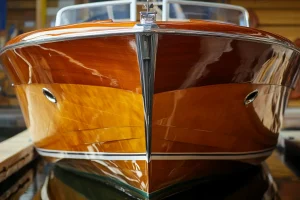
E. Teak Care Excellence: Cleaning, Brightening, and Sealing Wooden Decks
Teak is a prized material on boats for its natural beauty, durability, and non-slip properties, but it requires specific care to maintain its appearance and longevity. Understanding teak involves recognizing its two distinct grain types: the harder, darker grain and the softer, lighter grain. Improper cleaning, especially aggressive scrubbing with the grain or using harsh chemicals, can erode the softer grain, leaving a ridged, uneven surface that traps dirt and mildew.
Effective teak care involves a three-pronged approach:
- Cleaning:
- Routine Cleaning: A weekly or regular light scrubbing against the grain with a soft brush or fine Scotch-Brite pad and a mild detergent or specialized boat soap is recommended. This helps the wood wear evenly.
- Mildew Treatment: If mildew is present, a very small amount of bleach can be added to the cleaning solution, or a dedicated teak cleaner with mildewcide can be used.
- Two-Part Cleaners: For heavily soiled or weathered teak, two-part acid-based cleaners (Part 1 cleaner, Part 2 neutralizer/brightener) can be used, but sparingly. Overuse can damage the teak by removing too much of the soft grain and can also affect caulking. Always follow manufacturer instructions carefully.
- Brightening:
- After cleaning, teak brighteners can be applied to restore the wood’s golden hue, especially if it has turned grey or dark. Brighteners are primarily for aesthetic purposes and do not inherently preserve the wood. They often work by bleaching out stains and lightening the wood. Thorough rinsing is crucial after using brighteners.
- Sanding (Occasional Restoration):
- An occasional light sanding (e.g., once a year) can refresh the teak surface, removing the very top layer of weathered wood and any embedded grime, and ensuring both hard and soft grains are taken down evenly.
- The choice of sandpaper grit is important. An 80-grit finish is often used for decks to maintain good non-slip properties, while a finer 120-grit might be used on covering boards or trim for a smoother finish. Higher grits can make the teak more slippery. Always sand with the grain if sanding by hand for appearance, though against the grain is sometimes recommended for cleaning to lift dirt.
- Sealing/Finishing:
- Once the teak is cleaned, brightened, and (if necessary) sanded to the desired appearance, a sealer can be applied to protect the wood and prolong its freshly maintained look.
- Teak Sealers: Products like Semco or Ditec Triton penetrate the wood, seal the grain, and often contain UV inhibitors and biocides to resist weathering and mildew growth. Some sealers aim to maintain the natural, freshly sanded look without adding significant color or gloss, while others might impart a richer tone.
- Teak Oils: Traditional teak oils replenish the wood’s natural oils and enhance its color. However, some oils can attract dirt and promote mildew growth if not maintained regularly, especially in humid environments. They typically require more frequent reapplication than sealers.
- Application involves ensuring the teak is completely dry, then applying the chosen product according to manufacturer directions, often with a brush or cloth, and wiping off any excess. Multiple thin coats are usually better than one thick coat.
The goal of teak care is to strike a balance between maintaining its beautiful appearance and preserving the integrity of the wood. The chosen regimen will depend on the owner’s preference for the teak’s look (natural silver-grey, golden, or oiled) and the amount of maintenance they are willing to undertake.
F. Gleaming Accents: Metal Polishing for Stainless Steel, Aluminum, and Chrome
 Metal components such as stainless steel railings, cleats, chocks, aluminum towers, and chrome fixtures are susceptible to corrosion, oxidation, tarnish, and rust in the marine environment, primarily due to saltwater exposure and humidity. Regular polishing is not just for shine; it’s a critical preventative maintenance task that removes contaminants and applies a protective barrier.
The general process for polishing marine metals includes:
- Cleaning: The metal surface must first be thoroughly cleaned of loose dirt, salt deposits, and grime using fresh water and a mild boat soap. Rinse well and dry completely.
- Applying Polish: Select a polish specifically formulated for the type of metal being treated (e.g., stainless steel polish, aluminum polish/restorer, chrome polish). Common brands include Star brite, 3M, Flitz, Collinite, and Nevr-Dull. Apply a small amount of polish to a clean, dry cloth or applicator pad.
- Working the Polish: Rub the polish onto the metal surface, often in a circular or back-and-forth motion, applying firm pressure. For stubborn oxidation or rust, more effort or a slightly more abrasive polish might be needed. Some polishes are chemical cleaners that dissolve oxidation, while others have fine abrasives.
- Removing Residue/Haze: Allow the polish to dry to a haze as per the product instructions. Then, using a separate clean, dry microfiber cloth, buff the metal to a high shine, removing all polish residue.
- Protection (Optional): Some metal polishes leave a protective coating. For added protection, especially on aluminum, a specific metal wax or sealant (e.g., Collinite Metal Wax 850, Rupp Marine Aluma Guard) can be applied after polishing.
Considerations for Different Metals:
- Stainless Steel: Prone to surface rust and tea staining. Regular polishing with a good stainless steel polish (e.g., Star brite Chrome & Stainless Polish, 3M Marine Metal Restorer and Polish) is key.
- Aluminum: Can oxidize quickly, forming a dull, white powdery surface. Requires specific aluminum cleaners and restorers (e.g., 3M Aluminum Restorer and Polish, Star brite Ultimate Aluminum Polish with PTEF) that can remove this oxidation and restore luster. Anodized aluminum requires gentler, non-abrasive cleaners to avoid damaging the anodized layer.
- Chrome: Typically plated, so care must be taken not to use overly abrasive polishes that could wear through the plating. Chrome polishes are designed to clean and protect the shine.
A proactive maintenance schedule is beneficial: a freshwater rinse after each outing, a light polish monthly for high-exposure items, and a more thorough deep clean and polish quarterly or as needed. This consistent attention prevents severe degradation and keeps metal fixtures looking their best and functioning correctly.
G. Clear and Protected: Canvas and Isinglass Cleaning and Protection
Canvas (e.g., Bimini tops, boat covers) and clear vinyl enclosures (commonly Isinglass, Strataglass, or other brands) require specialized care to maintain their clarity, flexibility, and protective qualities. These materials are vulnerable to UV degradation, salt, dirt, mildew, and physical damage from improper handling or cleaning.
Isinglass/Clear Vinyl Care:
The primary goal is to clean without scratching and to protect against UV damage and embrittlement.
- Gentle Rinsing: Start with a gentle but thorough freshwater rinse to remove loose salt, dust, and grime. Avoid high-pressure sprays, which can drive abrasive particles across the surface and cause scratches.
- Washing: Use a mild boat soap or a cleaner specifically designed for clear vinyl (e.g., products from Novus Marine, Plexus, IMAR, Star brite, EZ2CY Cleaner Polish). Apply with a very soft, clean wash mitt or microfiber cloth dedicated solely to this purpose to prevent transferring grit.
- Avoid Harsh Chemicals: Never use household glass cleaners (like Windex), ammonia-based products, harsh solvents, or abrasive powders, as these can cause the vinyl to become cloudy, yellow, brittle, or crack. Paper towels should also be avoided as their fibers can be abrasive.
- Rinse and Dry: Rinse thoroughly with fresh water and gently dry with a clean, high-quality synthetic chamois or a soft microfiber cloth.
- Polishing and Protection: Periodically apply a plastic polish or protectant specifically formulated for clear vinyl. These products can fill minor scratches, enhance clarity, repel water (improving visibility in rain), and provide crucial UV protection to prevent yellowing and degradation. Some products like EZ2CY Cleaner Polish also offer anti-static and anti-fog properties. Apply protectants every 4-6 weeks during the season.
- Storage: When not in use, clear vinyl panels should be rolled, never folded, as folding can cause permanent creases and cracks. Ensure they are clean and completely dry before rolling, often with a soft towel or fabric interleaved between layers to prevent sticking and scratching. Store in a cool, dry place.
Canvas Care:
- Regular Cleaning: Brush off loose dirt regularly. Hose down periodically with fresh water.
- Washing: For more thorough cleaning, use a mild soap (like Woolite or Dreft) or a dedicated canvas cleaner. Gently scrub with a soft bristle brush.
- Rinse Thoroughly: Ensure all soap residue is rinsed out, as it can attract dirt and promote mildew.
- Air Dry: Allow canvas to air dry completely before storing to prevent mildew.
- Mildew Treatment: If mildew occurs, use a specialized mildew remover for fabrics or a diluted solution of bleach (test on an inconspicuous area first, as it can affect color). Rinse extremely well.
- Waterproofing and UV Protection: After cleaning and drying, reapply a waterproofing treatment (e.g., 303 Fabric Guard) to restore water repellency and UV resistance. This is crucial as cleaning can diminish the original factory treatment.
Proper care of these materials is essential not only for visibility and aesthetics but also for extending their service life, deferring costly replacements. The delicate nature of clear vinyls, in particular, means that gentle handling and the use of correct, specialized products are non-negotiable for their preservation.
H. Sure Footing: Non-Skid Deck Cleaning Techniques
Non-skid deck surfaces are vital for safety, providing necessary traction in wet conditions. However, their textured patterns can trap dirt, grime, scuff marks, and mildew, making them challenging to clean effectively without damaging the texture or the underlying gelcoat.
The approach to cleaning non-skid decks involves:
- Initial Cleaning:
- Sweep or hose off loose debris.
- Wet the deck thoroughly with fresh water.
- Apply a solution of mild detergent or a general boat soap with warm water. Scrub with a medium-soft deck brush, working in various directions to lift dirt from the texture.
- Rinse thoroughly with fresh water.
- Deep Cleaning for Stubborn Dirt and Stains:
- For more ingrained dirt, scuffs, or mildew, specialized non-skid deck cleaners are often necessary (e.g., West Marine Non-Skid Deck Cleaner, Star brite Non-Skid Deck Cleaner with PTEF, Poli Wash).
- Apply the cleaner as directed, often allowing it to dwell for a few minutes to penetrate and loosen the grime.
- Gently scrub with a deck brush. Avoid overly stiff bristles or excessive force that could wear down the non-skid pattern over time.
- Rinse thoroughly to remove all cleaner residue and lifted dirt. Some recommend using a hose with a nozzle to help flush out the texture.
- Treating Mildew and Tough Stains:
- For mildew, a 50/50 solution of white vinegar and water can be effective. Some sources suggest very diluted bleach solutions for stubborn mildew, but caution is advised as bleach can be harsh on gelcoat and surrounding materials if not used carefully and rinsed completely.
- Rust stains may require specific rust removers (e.g., FSR – Fiberglass Stain Remover, which is often oxalic acid-based), applied carefully and rinsed thoroughly.
- Protection and Restoration:
- Avoid using traditional waxes on non-skid surfaces, as this will make them dangerously slippery, defeating their purpose.
- Some specialized products are designed to protect non-skid decks without reducing traction, often by creating a dirt-repellent barrier.
- If the non-skid texture has worn down and become slick, products like Poli Grit™ Non-Skid Deck Sealer Kit can be used to restore texture and grip. This involves cleaning, prepping, and applying a textured coating followed by a sealant.
Consistent cleaning is key to preventing heavy buildup. Harsh chemicals and overly aggressive scrubbing tools should be avoided to preserve the integrity of the non-skid surface and the gelcoat. The goal is to maintain cleanliness and safety without compromising the deck’s essential function.
Exterior Surface Detailing Quick Reference Guide
To consolidate the diverse requirements for exterior care, the following table provides a summary:
| Surface Type | Common Issues | Recommended Cleaning Agents/Methods | Recommended Protection/Restoration | Key Precautions |
|---|---|---|---|---|
| Gelcoat (Hull/Superstructure) | Dirt, Salt, Oxidation, Waterline Stains | Mild boat soap, freshwater rinse. For oxidation: compounds. For waterline stains: specialized acid-based removers. | Marine wax/sealant, ceramic coatings. Compounding/polishing for oxidation. | Avoid harsh abrasives on good gelcoat. Use PPE with acid cleaners. Test products. Don’t over-compound. |
| Teak Decks | Dirt, Mildew, Greying, Stains, Grain Erosion | Mild detergent/teak cleaner, soft brush (against grain). Two-part cleaners sparingly. Brighteners for color. | Teak sealers (e.g., Semco), teak oils. Light sanding for restoration. | Avoid aggressive scrubbing with the grain. Limit use of harsh acids. Ensure full drying before sealing. |
| Metal (Stainless, Aluminum, Chrome) | Rust, Tarnish, Oxidation, Pitting, Salt Spots | Mild soap & water. Metal-specific polishes (e.g., Star brite, 3M, Flitz). | Metal wax or sealant after polishing, especially for aluminum. | Use correct polish for metal type. Avoid abrasives on chrome/anodized aluminum. Rinse salt regularly. |
| Clear Vinyl (Isinglass, Strataglass) | Scratches, Cloudiness, Yellowing, UV Damage | Gentle rinse, specialized vinyl cleaner (e.g., Novus, Plexus, IMAR, EZ2CY), soft mitt/cloth. | UV protectant polish. Scratch removers for minor marks. | NO Windex, ammonia, paper towels, or folding. Gentle handling is key. |
| Canvas (Covers, Biminis) | Dirt, Mildew, Stains, Loss of Water Repellency | Mild soap or canvas cleaner, soft brush. Specialized mildew remover if needed. | Reapply waterproofing and UV protectant (e.g., 303 Fabric Guard). | Ensure thoroughly dry before storing. Test cleaners on inconspicuous area. |
| Non-Skid Decks | Trapped Dirt, Scuffs, Mildew, Reduced Traction | Mild detergent, non-skid deck cleaner (e.g., West Marine, Poli Wash), medium-soft brush. | Specialized non-skid protectants (non-slip). Texture restorers (e.g., Poli Grit) if worn. | Avoid waxing. Avoid overly stiff brushes or harsh abrasives. |
This table serves as a quick guide, but always refer to product manufacturer instructions for specific application details and safety information.
3. Impeccable Interiors: Cabin, Galley, and Head Detailing
 The interior of a boat presents a diverse array of materials, each requiring specific care. From plush carpets and upholstery to fine wood trim and functional galley and head surfaces, maintaining a clean, fresh, and well-preserved interior is paramount for comfort and enjoyment. A critical understanding is that interior boat surfaces are highly varied (fabrics, vinyls, leathers, woods, plastics, glass), and using incorrect cleaning agents or methods poses a significant risk of irreversible damage. Product specificity and gentle techniques are paramount.
Furthermore, effective interior detailing is intrinsically linked to ongoing moisture and ventilation management. Cleaning efforts can be quickly undermined by a humid, poorly ventilated environment leading to recurring mold, mildew, and odors.
A. Cabin Comfort: Deep Cleaning Carpets, Upholstery, Headliner, and Walls
The living spaces within a boat are subject to foot traffic, spills, humidity, and UV exposure through windows, necessitating regular deep cleaning.
- General Preparation: Begin by removing loose items and thoroughly vacuuming all surfaces to remove dust, crumbs, and debris.
- Carpets: Marine carpets are typically water-resistant but still trap dirt.
- Vacuum thoroughly.
- Scrub with a solution of gentle soap or carpet shampoo and water, using a stiff bristle brush.
- Use a wet-vacuum or carpet extractor to remove dirty water and cleaning solution.
- Ensure thorough drying by promoting air circulation with fans, dehumidifiers, or the boat’s air conditioning system to prevent mildew.
- Fabric Upholstery (Cushions):
- If covers are removable, launder them according to fabric care instructions, typically a cold cycle and hang dry to prevent shrinkage.
- For foam cushions, sprinkle with baking soda, let sit for a few hours to deodorize, then vacuum off.
- A light mist of a 50/50 white vinegar and water solution can help neutralize odors and act as a mild disinfectant; allow to air dry completely in a well-ventilated area.
- For deeper cleaning of foam, some sources suggest hosing down, squeezing out water repeatedly until it runs clear, then thoroughly air drying.
- Vinyl Upholstery: Vinyl is common in marine settings due to its durability and water resistance, but it requires specific care to prevent cracking, fading, and mildew.
- Clean regularly (e.g., monthly) with a soft cloth or microfiber mitt using gentle soap and water.
- For tougher stains or ground-in dirt, use a dedicated marine vinyl cleaner. Avoid harsh chemical cleaners (especially those containing bleach or ammonia unless specifically formulated and recommended for spot treatment) as they can strip protective coatings and plasticizers, leading to premature aging.
- Rinse thoroughly after cleaning.
- Apply a marine vinyl protectant that contains UV inhibitors to nourish the vinyl, restore flexibility, and guard against sun damage and cracking. Some products offer combined cleaning and conditioning.
- Leather Upholstery: Leather adds a touch of luxury but is sensitive to moisture and UV.
- Clean with a nylon bristle brush and a liquid detergent suitable for leather, or specialized leather cleaners.
- Rinse well (if applicable per product instructions, often by wiping with a damp cloth) and allow to dry thoroughly.
- Apply a leather conditioner to keep it supple and prevent drying and cracking. Products containing beeswax or specific marine leather conditioners are good options.
- Protect with a UV inhibitor spray (e.g., 303 Aerospace Protectant) and consider water repellent sprays like 303 Fabric Guard for some types of leather finishes. Mothers VLR (Vinyl, Leather, Rubber) Care is also mentioned as a conditioning treatment.
- Headliners: Headliners can be delicate, often made of fabric backed by foam and adhesive.
- The least aggressive method is often best. Start by gently brushing with a soft cockpit brush to remove loose dust.
- For cleaning, lightly mist a carpet and upholstery cleaner onto the brush or a clean microfiber cloth, not directly onto the headliner, to avoid over-saturation which can damage the adhesive or cause water stains.
- Blot stains gently; do not scrub, as this can separate the fabric from its backing or spread the stain.
- A steamer on a low setting with a towel wrapped around the nozzle can be used with quick, light strokes to lift stains, followed by blotting.
- Some boaters have reported success using Woolite in a carpet cleaning machine for boat headliners, but this should be approached with caution due to moisture levels.
- Walls and Bulkheads: Clean based on the material (fiberglass, wood paneling, fabric-covered panels), using appropriate gentle cleaners and techniques for each.
A consistent theme for interior fabric and soft furnishing care is the gentle approach and thorough drying to prevent residual moisture that can lead to mold, mildew, and musty odors—common issues in the enclosed, often humid marine environment.
B. Galley Gleam: Meticulous Cleaning and Sanitization
The boat’s galley, or kitchen, requires diligent cleaning and sanitization to ensure a hygienic food preparation area and prevent odors and pest infestations.
- Degreasing: Cooking inevitably leads to grease buildup on various surfaces. Start by cleaning from top to bottom (walls, cabinets, ceilings, vents) with a good degreaser. For stubborn, baked-on grease, especially on stovetops or microwaves, a plastic scraper can be used carefully to lift grime without scratching surfaces. Products like Krud Kutter are recommended for tough grease.
- Sinks and Drains: Regularly flush drains with hot water to prevent clogs from grease and soap buildup. A flexible plastic drain snake can clear blockages. Use a plastic scraper to remove hardened residue around drain openings and faucet bases.
- Countertops and Surfaces: Clean with boat-safe, food-grade cleaners or a mild solution of dish soap and water. For hard water spots, ensure surfaces are dried promptly with a dedicated towel. Vinegar solutions can be effective for general cleaning and disinfection but should not be mixed with bleach.
- Appliances: Clean refrigerators, microwaves, and stovetops according to manufacturer instructions. For refrigerators turned off between uses, clean thoroughly and leave doors ajar to prevent odors and mildew.
- Cabinetry and Drawers: Wipe down interiors and exteriors. Remove crumbs and sticky residues. Use wood-specific cleaners for wooden cabinets.
- Stainless Steel Fixtures and Appliances: Use specialized stainless steel cleaners (e.g., Spotless Stainless) to remove fingerprints, water spots, and prevent rust.
- Flooring: Clean according to material (vinyl, teak, carpet), ensuring it is kept dry.
- Odor and Pest Control: Wash dishcloths and towels frequently, storing them in breathable bags. Ensure all food is stored in sealed containers. Dispose of garbage regularly.
Using boat-safe, preferably biodegradable, cleaning products is important, especially as galley waste often drains into the water system.
C. Head Hygiene: Thorough Cleaning and Sanitation of Bathrooms
 The marine head (toilet) and bathroom area require rigorous cleaning and sanitation to prevent odors, scale buildup, and bacterial growth.
- Toilet Bowl and System:
- Clean the bowl regularly with a non-abrasive toilet bowl cleaner specifically designed for marine heads. Avoid harsh household bleaches or chemical cleaners that can damage seals, hoses, and beneficial bacteria in holding tanks if a treatment system is used.
- Scale Prevention: Saltwater-flushed heads are prone to calcium carbonate scale buildup in hoses and valves, leading to difficult flushing and blockages. Run a pint of white vinegar through the system monthly (pump slowly, allowing contact time) to dissolve fresh scale. Follow with a freshwater flush.
- Heavy Scale Removal: For existing heavy scale, a 10% muriatic acid solution can be used with extreme caution (wear PPE, ensure ventilation, protect surfaces). Pour into the bowl, let it react, then pump through the system in stages. Rinse thoroughly with fresh water.
- Lubrication: After vinegar/acid treatment, lubricate the pump mechanism with marine toilet lubricant or mineral oil to keep parts supple and operating smoothly.
- Sinks, Counters, and Showers: Clean with suitable bathroom cleaners that are safe for marine surfaces (fiberglass, plastic, metal). Disinfect regularly.
- Drains and Sumps: Clean shower sumps and drains, adding a small amount of mild disinfectant (like a shower cleaner) to prevent odors and buildup. Ensure sump pumps are functioning correctly.
- Fixtures: Clean and polish metal fixtures to prevent corrosion and water spots.
- Odor Control:
- The primary source of head odor is often permeated sanitation hoses. Check hoses by wiping with a damp cloth; if the cloth smells, the hose needs replacement with proper sanitation-grade hose.
- Inspect all connections for leaks.
- Ensure the anti-siphon valve in the discharge line is clean (soak in soapy water) and properly vented outside the cabin.
- Prevent marine life buildup in the flush-water intake line by installing a strainer.
- Consider using holding tank treatments to break down waste and control odors.
- Ventilation: Good ventilation is crucial in the head to manage moisture and odors.
If the toilet is difficult to pump, leaks, or emits persistent odors despite cleaning, an overhaul with a rebuild kit (containing new valves, seals, gaskets) may be necessary.
D. Woodwork Warmth: Polishing and Protecting Interior Wood Surfaces
Interior wood trim, cabinetry, and paneling add warmth and elegance to a boat’s cabin but require care to protect against moisture, UV damage (through windows), and wear.
- Routine Cleaning: Dust regularly with a soft cloth. For general cleaning, use a mild wood cleaner like Murphy’s Oil Soap, which can also help remove light haze or film that can accumulate, especially after periods of storage. Wipe with the grain.
- Restoring Hazy or Spotted Wood (Finished Wood):
- Method 1 (Steel Wool and Linseed Oil): For blushing (white spots/haze often caused by moisture in the finish), gently rub the affected area with #0000 (ultra-fine) steel wool dipped in boiled linseed oil, always working with the wood grain. Wipe away any residue or wood dust with a clean, soft rag. This method gently abrades the surface of the finish.
- Method 2 (Denatured Alcohol): Ensure the surface is dry. Moisten a clean cloth with denatured alcohol and wipe the affected area with light, fast strokes. Do not rub, as this can damage the finish. This method works by re-amalgamating some types of finishes. Allow to dry.
- It is crucial to test these methods on an inconspicuous area first.
- Polishing and Protecting:
- After cleaning or restoration, apply a quality furniture polish or wax to protect the wood and enhance its luster. “Your Boat’s Interior Cabin Wood Care,” a product containing beeswax and lemon oil, is specifically marketed for marine interior wood. It nourishes the wood, helps protect against moisture and drying/cracking, and provides a soft, non-glossy protective barrier.
- Apply the polish or wax according to product directions, usually by rubbing it in gently, allowing it to penetrate, and then buffing with a clean, soft cloth to the desired sheen.
- For varnished wood, a good quality paste wax (e.g., Johnsons Paste Wax) can provide excellent protection and shine after cleaning.
- Teak Interiors: Interior teak may be finished (varnished) or oiled. If oiled, periodically re-oil with teak oil after cleaning. If varnished, treat as other finished woods. Unfinished interior teak can be cleaned with mild soap and water or specific teak cleaners.
Regular attention to interior woodwork prevents minor issues from becoming major restoration projects and keeps the cabin looking rich and inviting.
E. Crystal Clear Views: Cleaning Windows and Portlights (Interior Perspective)
Maintaining clear, clean windows and portlights from the inside is just as important as the exterior for visibility and overall cabin brightness.
- Acrylic or Polycarbonate Windows (Plastic):
- These are common for portlights and some windows. As with exterior cleaning, avoid harsh chemicals, ammonia-based glass cleaners (like Windex), and abrasive materials, as these can cause crazing, clouding, or scratching.
- Clean with warm, soapy water (mild detergent) using a soft cloth or microfiber towel.
- Rinse by wiping with a clean, damp cloth and dry with another clean, soft microfiber cloth to prevent spots.
- For light scratches or haze, a specialized plastic polish can be used from the inside as well.
- Regular application of a UV protective coating like that in the Clear View Kit can also benefit the interior side if it’s exposed to significant sunlight.
- Vinyl Windows (e.g., in enclosures extending into the cabin space):
- Treat the interior side the same as the exterior: use specialized clear vinyl cleaners and protectants. Ensure good ventilation when using spray products.
- Glass Windows:
- Real glass windows and portlights can be cleaned with standard household glass cleaners.
- Spray the cleaner onto a microfiber cloth rather than directly onto the glass to prevent overspray from contacting and potentially damaging surrounding sensitive materials like wood trim, upholstery, or headliners.
- Wipe clean with the cloth, then buff with a dry section of the cloth or a separate dry microfiber towel for a streak-free finish.
Regular cleaning of interior window surfaces removes fingerprints, salt spray residue (if windows are opened at sea), dust, and condensation marks, ensuring the best possible views and a brighter cabin environment.
Interior Surface Cleaning and Care Guide
The diverse materials found inside a boat necessitate a tailored approach to cleaning and maintenance.
The following table offers a consolidated reference:
| Surface Type | Common Issues | Recommended Cleaning Agents/Methods | Recommended Conditioning/Protection | Key Precautions |
|---|---|---|---|---|
| Carpet | Stains, Dirt, Mildew, Odors | Vacuum regularly. Gentle soap/carpet shampoo, stiff brush, wet-vac/extractor. | Ensure thorough drying (fans, A/C, dehumidifier). | Avoid over-wetting, ensure complete drying to prevent mildew. Test cleaners in an inconspicuous area. |
| Fabric Upholstery | Stains, Mildew, Odors, Wear | Removable covers: cold wash, hang dry. Foam: baking soda for odors, vacuum. Vinegar/water mist (50/50) for light disinfection. | Fabric protectants (e.g., Scotchgard for marine use) after cleaning. Ensure thorough drying. | Check fabric care labels. Avoid harsh detergents. Test cleaners. Ensure complete drying. |
| Vinyl Upholstery | Stains, Mildew, Cracking, Fading, Body Oils | Gentle soap & water, soft rag. Marine vinyl cleaner for stains. | Marine vinyl protectant with UV inhibitors (e.g., Marine 31, 303 Aerospace Protectant). | Avoid harsh chemicals, bleach (unless spot-treating specific mildew stains per product instructions), ammonia, abrasive cleaners. |
| Leather Upholstery | Stains, Drying, Cracking, Fading | Nylon bristle brush, liquid detergent for leather, or specialized leather cleaner. | Leather conditioner (e.g., beeswax-based, Mothers VLR). UV inhibitor (303 Aerospace). Water repellent (303 Fabric Guard). | Avoid excessive water. Test products. Condition regularly. |
| Headliner | Dust, Stains (water, mildew), Sagging (if wet) | Gentle brushing. Light mist of carpet/upholstery cleaner on brush/cloth, blot gently. Steamer (low, towel-wrapped nozzle). | – | AVOID OVER-SOAKING (can damage adhesive). Do not scrub. Test cleaners. |
| Interior Wood | Haze, Water Spots, Scratches, Drying, UV Damage | Dust regularly. Mild wood cleaner (Murphy’s Oil Soap). For haze: #0000 steel wool + linseed oil, or denatured alcohol (test first). | Furniture polish/wax (e.g., “Your Boat’s Interior Cabin Wood Care” – beeswax/lemon oil, Johnsons Paste Wax). | Work with grain. Avoid excessive moisture on unfinished wood. Test restoration methods. |
| Acrylic/Polycarbonate Windows | Scratches, Crazing, Haze, Fingerprints | Warm soapy water, soft cloth. Rinse with damp cloth, dry with microfiber. | Specialized plastic polish for light scratches. UV protective coating. | NO Windex, ammonia, harsh chemicals, abrasive cleaners, paper towels. |
| Glass Windows | Streaks, Fingerprints, Salt Film | Standard glass cleaner. | – | Spray cleaner on cloth, not glass, to avoid overspray on sensitive surrounding materials. Use microfiber cloths. |
| Galley Surfaces | Grease, Food Spills, Water Spots, Odors | Degreaser. Mild dish soap. Boat-safe multi-surface cleaners. Vinegar solution. Stainless steel cleaner. | Ensure surfaces are dry. Use cutting board to protect counters. | Use food-safe cleaners on prep areas. Ensure good ventilation. Avoid abrasive cleaners on delicate surfaces. |
| Head Surfaces | Scale, Soap Scum, Mildew, Odors, Bacteria | Marine head cleaner. Vinegar for scale. Mild bathroom disinfectants. | Regular flushing of toilet system with fresh water if possible. Holding tank treatments. | Avoid harsh chemicals that damage toilet seals/hoses or holding tank bacteria. Ensure good ventilation. |
4. Servicing Technical Areas: Ensuring Cleanliness and Functionality
 The cleanliness and proper maintenance of a vessel’s technical areas, such as the bilge and engine room, are paramount. These spaces, though often unseen, are critical to the boat’s safe operation, longevity, and environmental compliance. Issues originating here, like fluid leaks or clogged pumps, can have serious consequences if not addressed. Therefore, detailing these areas is not merely about aesthetics but is a fundamental aspect of responsible boat ownership and preventative maintenance.
A. Bilge Integrity: Effective Cleaning and Deodorizing Methods
The bilge is designed to collect incidental water that finds its way into the hull, whether from packing gland drips, rain, or small leaks, until it can be pumped overboard. A dirty bilge, however, can become a source of foul odors, a breeding ground for mold and mildew, and can conceal evidence of leaks. Furthermore, oily bilge water, if pumped overboard, can result in significant environmental fines.
Effective bilge cleaning and deodorizing involves several steps:
- Identify and Eliminate Sources of Contamination: Before cleaning, it’s crucial to address the root causes of bilge contamination. This includes repairing any leaks from engines, transmissions, packing glands, or sanitation hoses. Shower and icebox drains should ideally be plumbed into dedicated sumps rather than directly into the bilge to prevent soap, hair, and food particles from accumulating and decomposing. The anchor locker should also be checked and cleaned, as it can introduce mud and organic matter. The effectiveness of bilge cleaning is highly dependent on first addressing and rectifying such fluid leaks and contaminant sources; cleaning without fixing the source leads to a rapidly recurring problem.
- Safety First: Turn off all automatic bilge pumps to prevent accidental discharge during cleaning. Ensure adequate ventilation, especially if using strong cleaners.
- Debris Removal: Manually remove any solid debris, trash, or heavy sludge from the bilge.
- Application of Bilge Cleaner: Use a biodegradable, oil-emulsifying bilge cleaner. These products work by breaking down oil, fuel, and sludge, holding them in suspension so they can be pumped out. Add the cleaner according to the manufacturer’s directions (e.g., 1 quart per 24 feet of boat length) and add some freshwater if the bilge is dry to help distribute the cleaner.
- Agitation and Dwell Time: If the boat is docked, the natural rocking motion can help agitate the cleaner. Allow the cleaner to remain in the bilge for an extended period, often overnight, to effectively break down contaminants.
- Pump Out and Proper Disposal: Pump the bilge contents into a suitable container for proper disposal ashore at an approved facility. It is critical to remember that even if a bilge cleaner is labeled “biodegradable,” the emulsified oil and water mixture is typically considered a pollutant and must not be discharged overboard.
- Flushing: After pumping out the cleaning solution, flush the bilge thoroughly with plenty of freshwater and pump out again, disposing of the rinse water responsibly.
- Drying: Remove any remaining water using sponges, rags, or a wet/dry shop vacuum. A dry bilge is less likely to develop odors or support mildew growth.
- Deodorizing: True deodorizing comes from eliminating the source of odors, not masking them. For ongoing odor prevention, small amounts of a mild, environmentally friendly household disinfectant (e.g., shower cleaner, approximately 1/8 cup) can be added to drains, sumps, air conditioning condensate pans, and the prop shaft stuffing box area, allowing the disinfectant to follow drainage paths to the bilge. Good below-decks ventilation is also crucial.
A clean bilge makes it easier to spot new leaks, ensures bilge pumps and float switches operate correctly, and contributes to a healthier, odor-free environment onboard.
B. Engine Room Excellence: Degreasing and Cleaning for Optimal Performance and Safety
The engine room, whether housing outboards, sterndrives, or inboards, is the heart of the vessel. Keeping this space clean and well-maintained is crucial for several reasons: it allows for easier identification of fluid leaks (oil, fuel, coolant), reduces fire hazards from accumulated flammable materials, helps prevent corrosion of engine components and electrical connections, and generally makes routine maintenance tasks more manageable and pleasant. Cleanliness in technical areas like the engine room is fundamentally linked to the safe operation of the vessel.
Cleaning Outboard/Sterndrive Engines (Powerhead and Exterior):
- Exterior Cowling: Wash the engine’s exterior cowling as part of the regular boat wash, using boat-specific soap. Specialized products like Mercury All-In-One Spotless Shine or Cowl Finishing Compound can be used to enhance gloss and protection.
- Powerhead Cleaning: Periodically, the powerhead under the cowling needs cleaning. For saltwater boaters, a freshwater rinse after every trip is recommended to prevent corrosion; freshwater boaters might do this a couple of times a year.
- Remove the flywheel cover for better access.
- Use a low-pressure freshwater rinse. Avoid high-pressure spray, especially around electrical components, air intakes, and belts.
- For heavily soiled powerheads, a light degreaser can be sprayed on and allowed to dwell before rinsing.
- Once thoroughly dry, spray external metal surfaces of the powerhead with a corrosion inhibitor like Mercury Precision Care Corrosion Guard, taking care to avoid the air intake, alternator, belts, and pulleys.
Cleaning Inboard Engine Rooms:
- Degreasing: This is often the first and most critical step.
- Use a biodegradable engine degreaser (e.g., Mean Green Super Strength Cleaner & Degreaser). Spray it onto engines, stringers, bulkheads, and other greasy surfaces.
- Use an assortment of brushes (stiff-bristled pot scrubbers, toothbrushes, even Q-tips for tight spots) to agitate and break up caked-on grease and grime.
- Wipe off the loosened grease and cleaner residue with rags or absorbent pads. Rinse carefully with water, ensuring that contaminated runoff does not enter the bilge directly or is captured for proper disposal (e.g., with a shop vacuum).
- Steam Cleaning: For deep cleaning and degreasing with minimal water and no chemicals, a steam cleaner (e.g., VaporJet) can be highly effective. Superheated steam can break down grime and soften grease on engines, under gearboxes, and in bilge areas. Wipe surfaces after steaming for best results.
- Cleaning Flat Surfaces and Bulkheads: For general dirt on engine beds or bulkheads, an abrasive cleaning eraser (like Wipeout Eraser) used with plain water or boat soap can be effective.
- Water Management: Use water hoses judiciously. While marine engines are designed for a wet environment, avoid directly spraying sensitive electronics. Any water containing oil or fuel must be collected (e.g., with a Shop-Vac) and disposed of responsibly, not pumped overboard.
- Absorbent Pads: After cleaning, place fresh oil-absorbent pads under engines and transmissions. This not only helps manage minor drips but also makes it easy to spot new leaks.
- Touch-Up Painting: Address any flaking paint or surface rust on engines or components. Scrape off loose material, clean the area, prime with a rust converter (e.g., Ospho), and then apply high-temperature engine enamel in the appropriate color. This improves appearance and prevents further corrosion.
A clean engine room is a sign of a well-maintained vessel and contributes significantly to its reliability and safety. As with bilge cleaning, addressing the source of any leaks is paramount for long-lasting cleanliness.
5. Specialized Detailing Services: Addressing Unique Needs
 Beyond routine cleaning and polishing, certain specialized detailing services address unique needs, often related to aesthetic customization, protection, or seasonal transitions. These tasks can carry a higher risk of damaging the vessel’s surfaces if performed incorrectly, underscoring the value of professional expertise or extreme caution for DIY attempts.
Moreover, these services are often tied to specific points in a boat’s lifecycle, making them crucial for maintaining value and usability during these transitions.
A. Graphics Management: Professional Decal Removal and Application
Boat names, registration numbers, striping, and custom graphics are typically made of vinyl decals. Over time, these can fade, crack, peel, or an owner may wish to change them.
Decal Removal Process:
- Gather Supplies: A heat gun or hairdryer, plastic (non-marring) razor blades or scrapers, an optional drill eraser wheel, adhesive remover (e.g., denatured alcohol, Goo Gone Marine, 3M Adhesive Remover), microfiber cloths, and boat soap are needed.
- Wash Surface: Clean the decal and the surrounding area thoroughly with boat soap and water to remove any surface dirt or grime.
- Removal Method (Choose or Combine):
- Heat Application: Set a heat gun to a low setting or a hairdryer to high. Gently warm the decal by moving the heat source back and forth a few inches from the surface. This softens the vinyl and the underlying adhesive. Be careful not to overheat, which can damage the gelcoat or paint, or cause the decal to come off in tiny, frustrating pieces. Once warmed, use a plastic scraper or fingernail to lift an edge and slowly peel the decal back on itself at a sharp angle. Apply more heat as needed for stubborn areas.
- Plastic Scraper/Tool: For older, brittle decals, a plastic scraper can help lift edges and remove pieces, but care must be taken not to gouge the surface.
- Drill Eraser Wheel: A rubber eraser wheel (e.g., 4-inch) attached to an electric or pneumatic drill (run at around 2,000 rpm) can be effective for removing stubborn decals and adhesive, especially pinstripes. It essentially “erases” the decal. Work in small sections and be mindful of heat buildup.
- Remove Adhesive Residue: After the vinyl is removed, a sticky adhesive residue often remains. Apply a suitable adhesive remover to a microfiber cloth and rub the affected area in small circular motions until the residue is dissolved and wiped away.
- Clean Again: Wash the area with boat soap and water to remove any solvent traces. Rinse and dry thoroughly.
- Address “Ghosting”: Often, the gelcoat or paint under the decal will be a different shade than the surrounding exposed surface due to UV protection by the decal or oxidation of the surrounding area. This “ghost” image may require careful compounding and polishing of the entire section to blend the finish and achieve a uniform appearance.
Decal Application Process:
Applying new decals correctly is crucial for a professional look and long-lasting adhesion.
- Surface Preparation: The surface must be impeccably clean, smooth, and completely free of any wax, polish, or oils. Clean with soap and water, then wipe down with an alcohol-based prep solvent or a specific decal prep solution just before application.
- Temperature and Conditions: Apply decals in moderate temperatures (as recommended by the decal manufacturer), avoiding direct, hot sunlight or very cold conditions, which can affect adhesion. Low humidity is also preferable.
- Alignment: Carefully measure and mark the desired placement using masking tape to create hinge points or guidelines. This is critical for accurate positioning, especially with large or complex graphics.
- Application Method:
- Dry Method: Suitable for smaller, simpler decals. Carefully peel a portion of the backing paper away, align the decal, and apply one edge to the surface. Use a plastic squeegee to smooth the decal onto the surface, working from the center outwards to eliminate air bubbles. Gradually remove the rest of the backing paper as you apply.
- Wet Method: Often preferred for larger or more complex decals as it allows for some repositioning. Lightly spray the surface and the adhesive side of the decal (after removing the backing paper) with a very mild solution of water and a drop or two of baby shampoo or application fluid. Position the decal, then use a squeegee to firmly press out the water/solution and any air bubbles, again working from the center outwards.
- Remove Application Tape (if present): Many decals come with a top layer of application tape. Once the decal is squeegeed down (and after a short waiting period for wet applications), carefully peel the application tape back on itself at a 180-degree angle, ensuring the vinyl decal remains adhered to the boat surface.
- Post-Application: Allow the decal adhesive to fully cure for the time specified by the manufacturer (often 24-72 hours) before washing the boat or subjecting it to heavy use. Prick any small remaining air bubbles with a fine pin and press the air out.
Due to the risk of damaging the boat’s finish during removal or misapplying new graphics, many owners opt for professional services for these tasks.
B. Seasonal Transitions: Safe and Efficient Shrink Wrap Removal
Shrink wrap is a popular method for protecting boats during off-season storage, creating a tight barrier against weather, dirt, and pests. Come spring, proper removal is necessary to prepare the boat for the season without damaging it.
Tools and Safety:
- A sharp utility knife or, preferably, a specialized shrink wrap film knife (e.g., Mr. Shrinkwrap Film Knives, which often have guarded or rotary blades) is essential to cut the thick plastic safely and minimize the risk of scratching the boat’s gelcoat or other surfaces.
- Wear gloves for better grip and protection.
Removal Steps:
- Remove Accessories First: Before cutting the main cover, remove any reusable components such as vents, zipper access doors, or support poles that were part of the shrink wrap structure. These items are typically not recyclable with the plastic film.
- Plan Your Cuts: Inspect the wrap to identify the perimeter band (a strap or rope cinching the wrap below the boat’s gunwale or around the hull). The main cuts should generally be made above this band.
- Initial Cut: The first cut is often recommended along the bottom edge of the wrap, parallel to the ground (or slightly above the perimeter band), starting near the stern or cockpit area. This helps to loosen the tension on the wrap.
- Cutting Technique: When cutting, always direct the blade away from the boat’s surface and away from your body to prevent injury or scratches. If possible, lift the plastic slightly away from the boat before cutting. Some recommend cutting the inside layer after making an initial opening to further protect the boat’s surface.
- Remove in Sections or Pull Off: Once sufficient cuts are made to relieve tension and free edges (especially around the perimeter band), the wrap can often be pulled off the boat in large sections, starting from the stern or another accessible point. Minimize the need for further cutting directly against the hull.
- Recycling: Heavy-duty shrink wrap (typically LDPE #4 plastic) is recyclable if it is clean and free of contaminants like tape, labels, zippers, and excessive dirt. As you remove the wrap, try to ball it up or fold it to keep it as clean as possible. Many marinas and specialized recycling programs (like those sometimes offered by shrink wrap suppliers) accept boat shrink wrap. Check local resources for disposal and recycling options.
Taking time and using careful cutting techniques are key to a damage-free shrink wrap removal process, ensuring the boat emerges from storage ready for detailing and use.
6. The Professional Advantage: Why Entrusting Your Vessel to Experts Pays Dividends
While DIY boat detailing can be a rewarding endeavor for some, there are compelling reasons why many boat owners choose to entrust their vessels to professional detailing services. The decision often hinges on a careful consideration of expertise, efficiency, the quality of results, access to specialized resources, time constraints, and the overall long-term value and preservation of the vessel.
The true cost of DIY detailing extends beyond material expenses to include the owner’s time, the learning curve, the risk of errors, and potentially a lower quality or less durable result, which can shift the perceived value proposition of professional services.
A. Expertise, Efficiency, and Superior Results
 Professional detailers bring a level of knowledge and experience that is difficult for the average boat owner to replicate. They are familiar with a wide range of boat types, surface materials (gelcoat, paint systems, various metals, woods, plastics, fabrics), and the specific challenges posed by the marine environment. This expertise allows them to accurately diagnose issues like oxidation severity, stain types, or material sensitivities, and then select the most appropriate and safest products and techniques. For instance, notes that inconsistent DIY work can actually damage gelcoat further, a risk minimized by professional know-how.
Efficiency is another significant advantage. Professionals, equipped with experience and often working in teams, can complete complex detailing tasks much faster than a DIYer. A full exterior detail that might consume an entire weekend for an owner could be accomplished by a professional team in a fraction of that time. This efficiency translates directly into more time on the water for the owner.
Ultimately, this combination of expertise and efficiency often leads to superior and more consistent results. Professionals can achieve a higher level of finish, particularly in demanding tasks like heavy oxidation removal, multi-stage paint correction, achieving a flawless high-gloss wax, or intricate interior cleaning.
B. Access to Specialized Tools, Products, and Techniques
The marine detailing industry utilizes a range of specialized tools and products that may be beyond the practical or financial reach of the average boat owner. This includes:
- Professional-Grade Equipment: High-speed rotary polishers, dual-action orbital buffers with various pad types, hot water extractors for carpets and upholstery, steam cleaners for deep sanitization and degreasing, and specialized vacuum systems.
- Advanced Products: Professionals often have access to, and experience with, a wider array of professional-grade or sometimes restricted-use cleaning agents, compounds, polishes, glazes, and long-lasting protective coatings (like ceramic or graphene coatings) that may offer enhanced performance, durability, or specific application benefits not readily available in consumer-grade retail products.
- Refined Techniques: Mastery of advanced techniques such as wet sanding for severe gelcoat restoration, precise machine polishing to avoid swirl marks or holograms, and methods for safely cleaning delicate interior materials require significant practice and skill.
This access to better tools and products, combined with the skill to use them effectively, allows professionals to tackle a broader range of issues and achieve a higher standard of finish.
C. Time Savings and Peace of Mind
Boat detailing is a physically demanding and time-consuming process. For many owners, their leisure time is valuable. Hiring a professional detailer frees up this time, allowing owners to focus on enjoying their vessel or other pursuits rather than laboring over its maintenance.
Beyond time savings, professional services offer convenience. The detailer typically handles everything from bringing the necessary supplies and equipment to managing the cleanup and proper disposal of any waste products.
Perhaps one of the most significant benefits is the reduced risk of damage. Inexperienced DIY attempts can lead to costly mistakes, such as burning through gelcoat with improper polishing techniques, scratching surfaces with incorrect tools or abrasives, or using chemicals that damage sensitive materials. Entrusting the work to a reputable professional provides peace of mind that the job will be done correctly and safely.
D. Maximizing Resale Value and Vessel Longevity
A consistently well-maintained and professionally detailed boat not only looks better but also holds its value significantly more effectively in the competitive resale market. A gleaming, well-protected finish, pristine brightwork, and an immaculate interior make a strong first impression on potential buyers and can justify a higher asking price.
Moreover, the protective aspects of professional detailing—such as regular waxing, sealing of porous surfaces, corrosion inhibition on metals, and UV protection for vinyl and fabrics—contribute directly to the longevity of the vessel’s components. By mitigating the damaging effects of the marine environment, professional detailing helps to defer costly repairs or replacements of gelcoat, paint, upholstery, and fixtures. Professionals may also spot early signs of potential problems (e.g., minor gelcoat crazing, early corrosion, hidden mildew) during the detailing process, allowing for timely intervention before they escalate.
E. Cost Considerations (DIY vs. Professional)
While DIY detailing may appear to have lower upfront costs, a full accounting reveals a more nuanced picture. The initial investment for a DIYer to acquire quality tools (buffers, extractors, etc.) and a range of suitable marine-specific products can be substantial. Added to this is the “hidden” cost of the owner’s time, which can be considerable.
Professional detailing services have per-service fees, which vary based on boat size, condition, and the scope of work. However, these costs can be offset by the time saved, the superior quality and durability of the results, and the prevention of potentially expensive DIY mistakes. Investing in professional detailing can be more cost-effective in the long term by ensuring thoroughness, maximizing the lifespan of protective treatments, and potentially reducing the frequency or severity of major restoration needs down the line.
Choosing a professional detailer can also be seen as initiating a long-term relationship with a trusted advisor for boat care. Over time, a good detailer learns the specific needs and usage patterns of a client’s boat, potentially offering customized maintenance plans and becoming a valuable partner in the vessel’s overall upkeep and value preservation.
DIY vs. Professional Detailing – A Comparative Analysis
The decision between DIY and professional detailing is personal, depending on individual priorities, budget, skills, and available time. The following table provides a comparative analysis:
| Aspect | DIY Approach | Professional Service |
|---|---|---|
| Initial Cost | Moderate to High (tools, diverse products) | Per-service fee (no large upfront personal investment in tools) |
| Long-Term Cost | Can be lower if done correctly; higher if mistakes require rework | Potentially lower due to quality, longevity of protection, and damage prevention |
| Time Investment | Very High (learning curve, labor) | Low (owner’s time is freed up) |
| Skill/Knowledge Required | High (for quality results and to avoid damage) | Provided by the service (experts with training and experience) |
| Equipment Investment | Significant for comprehensive detailing | None for the owner (professionals use their own specialized equipment) |
| Quality of Results | Variable; can be good with dedication, but risk of inconsistency | Generally Superior and Consistent (professional finish) |
| Risk of Damage | Higher for inexperienced individuals | Lower (professionals are trained and insured) |
| Convenience | Low (owner does all work, sourcing, cleanup) | High (turnkey service) |
| Impact on Resale Value | Positive if done well; negative if done poorly | Generally very positive, enhances marketability and price |
Ultimately, the choice reflects a balance between the satisfaction and potential cost savings of DIY work against the convenience, quality assurance, and time savings offered by professionals.
7. The Enduring Value of Meticulous Boat & Yacht Detailing
Meticulous boat and yacht detailing is far more than a superficial exercise; it is an essential investment in the vessel’s longevity, aesthetic appeal, operational readiness, and financial value. Throughout this guide, the intricate processes involved in cleaning, restoring, and protecting every facet of a marine craft—from the robust hull to the delicate interior finishes and critical technical areas—have been explored.
The evidence strongly suggests that while DIY detailing is feasible, engaging professional services often provides a superior return on investment for many owners. Professionals bring a depth of expertise, access to specialized tools and products, and an efficiency that is challenging for the average boat owner to match. This translates into higher quality, more durable results, significant time savings, and a reduced risk of costly errors that can arise from inexperience.
The ability of a professional to correctly diagnose issues, apply advanced techniques, and even spot potential maintenance concerns early contributes to the overall preservation and trouble-free enjoyment of the vessel.
Furthermore, the impact of consistent, high-quality detailing on a boat’s resale value cannot be overstated. A vessel that gleams with well-maintained gelcoat, pristine metalwork, clear vinyl, and an immaculate interior not only commands a better price but also sells more quickly.
In essence, boat and yacht detailing is a critical component of responsible ownership. Whether undertaken by a dedicated owner or a skilled professional, the commitment to meticulous care ensures that the vessel remains a source of pride and pleasure, safeguarding its condition against the relentless marine environment and preserving its worth for years to come. For those who value their time, seek the highest standard of care, and wish to maximize their vessel’s lifespan and value, professional detailing stands out as the preferable and often more prudent choice.


